|
When it comes to life's biggest events, you don't get much bigger than the birth of a baby. And so it follows that the shower leading up to this occasion should be appropriately meaningful. Happily, this does not require slaving over a fantastically elaborate spread. To truly honor these new beginnings (and elicit "oohs" and "aahs" from your guests), all you need is a little creative vision and a few personal touches! Choose fun invitationsThis is your guests first introduction to the theme of your baby shower - make it memorable! Make your baby shower invitation into a mock library slip for the mom-to-be's "Great Expectations". Write the party details on a vertical index card, stamp the book's (baby's) due date at the bottom, and mail the card in a coin envelope. Everything needed to make this invitation is sold at office supply stores. Check out our gallery below of a bunch of fun and cute invitations we love - hopefully they inspire you! Decorations and set upLong considered mere filler (and unwanted filler, at that!), baby's breath is strikingly lovely on it's own when gathered in a large, airy bunch. Sold at most florist shops, it's inexpensive and neutral enough to work in any setting. Drop a generous handful into a tall ceramic glass vase. Check out our gallery below for a fresh take on centerpieces for your baby shower! Alternative SeatingIf you don't have a dozen extra chairs lying around (or room to set them up), provide throw pills or ottomans for guests to sit on. And, if possible, limit the gift opening portion of the party to one hour or less. Any longer and all guests can start to get antsy. Candy DecorationsGarnish a baby shower table with Champagne glasses, each filled with a perfect coupling of jelly-bean flavors (coconut with pineapple, lemon with lime and cherry with vanilla). Bonus: Is Mommy having specific sweet cravings? Use those candies or flavors instead of jelly-beans. Double-Duty DecorationsTo give your shower a garden-party feel, buy small pots of thumb and slip a popsicle stick that identifies the herb (and, thanks to a play on words, announce the upcoming due-date). Bonus: These plans double a party favors. Visit our gallery below for other baby shower party favor ideas! The ActivityA successful shower game is easy to play, appeals to all ages, and does not overly embarrass the honoree. If you're throwing a baby shower, ask each guest to bring or send a photograph of themselves as an infant. String the pictures along a wall with a clothesline and pins, and have guests try to decipher one adorable face from the next. You can keep it casual and have guests point out their pictures as they walk down the line. Or, to make a true game out of it, number the clothespins and have guests write down guesses as to which pin is holding who's photo. Keep a master list and act as a judge. Added benefit: The clothesline doubles as a sweet decoration, and you can hang some of the cute shower loot - onesies, booties, bibs - on the line when the honoree is opening her gifts. Next week, we'll discuss more of our favorite baby shower games. Gift-Unwrapping StashStick the supplies the honoree will need under her chair so you won't have to part the sea of guests to fetch them in the middle of the party. Include scissors, large trash bags, a notebook and pen/pencil to record the gifts and gift givers, and sticky labels to help keep similar gifts straight. Wrap UpOpening the presents is the easy part. Helping the honoree pack them back up (and doing it quickly and efficiently) is more challenging. Here are some tried and true methods to helping your honoree bring her gifts home: •Group them: Arrange the gifts into labeled shopping bags or boxes according to type (baby clothes, tops, linens, kitchenware, etc.) When the honoree arrives home, she'll have an easier time unpacking the gifts. •Carry them: When a shopping bag is stuffed with presents, it can be difficult to grasp both handles at once. Make it easier to carry the bag by fashioning a sturdy handle out of packing tape. Cut a 16-inch strip of tape and fold it in half lengthwise, adhesive sides in, so that it's still 16-inches long but half as wide (and not sticky to touch). Thread the strip through the bag's handles and tip the ends of the strip above the handle; seal them together with more tape. This loop is your new handle. •Ship them: If the guest of honor lives in another town, have a supply of shipping boxes and labels on hand so the gifts can be sent directly from your house to hers. That way, she won't get stuck with excess baggage fees on her flight or a car too full of boxes to fit the people she's traveling with. •Stuff them: Don't have an economy size carton of packing peanuts stashed in your garage? Then use the discarded wrapping and tissue paper from the opened presents to cushion fragile items before the guest of honor lugs from them. (Even if the breakables are nestled safely in individual boxes, stuff extra padding between boxes to safeguard against jostling.) We hope you found these tips and tricks helpful! Do you have some go-to tips and tricks that you didn't see mentioned above? Share them with us on one of our social media sites! Next week, we'll share some of our favorite baby shower games! If you have an idea for a future blog post, send us an email or comment - we’d love to hear from you!
1 Comment
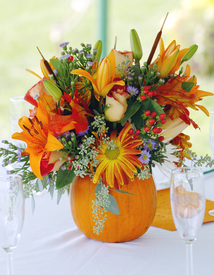 Fall is our favorite time of year at Without A Hitch Events; we love decorating our houses and various venues during the Fall season! Every year, we look forward to creating a new and beautiful centerpiece for our Thanksgiving table. Take a look below to see some of the centerpiece designs that we've created in the recent past: Pumpkin Vase: We're so lucky to live right near Half Moon Bay, California - the epicenter of all things pumpkin! Every year, we visit one of the local pumpkin patches and pick out a few pumpkins that we love and use them for decorations around the house or for gifts. Paired with some fresh flowers in rich Fall colors, a pumpkin vase is a creative take on the table centerpiece and it is usually a talking point for guests. This is also a great idea when bringing flowers to a family member or friend's house during the Fall. A pumpkin vase is so easy to make, here are some tools you'll need and instructions: Tools: Pumpkin Circular or oval container (soup can, cup, etc.) Knife or pumpkin carving tool Pen or Sharpie Spoon Seasonal flowers Water Plant food (optional) Instructions: -Put the circular or oval container on top of the pumpkin to use as a tracing guide. Using a pen or Sharpie, trace the outside rim of the container and score for a perfect fit. -Cut off the top of the pumpkin. -Scoop out the pulp on the inside with a spoon. While the pulp isn't necessary for the rest of this project, you might have other uses for it -- save it if you need it, otherwise you can discard. -Place the circular or oval container inside the pumpkin to hold the flowers. -Add water and plant food (optional) and arrange the flowers. According to Martha Stewart: Fall season flowers include dahlias, cockscombs, rose hips, and mini crab apples. Consult with a local florist if you would like more information about what is in season at this time. Pumpkin Tea Lights: On a recent trip to Safeway, we discovered that they had mini pumpkins (SO CUTE!). And it dawned on us that these would make great tea light holders! If you are anything like the Without A Hitch team, you have hundreds of tea lights in various drawers throughout the house; and you're looking for any excuse to use them. These little beautifies are a quick and easy DIY project. Here are some tools you will need and instructions: Tools: Mini pumpkin(s) Knife or pumpkin carving tool Pen or Sharpie Spoon Flower cutters Votive or tea light candles Instructions: -Using the flower cutters, trim the stem of the mini pumpkin. Then put the candle on top of the pumpkin to use as a tracing guide. Using a pen or Sharpie, trace the outside rim of the candle and score for a perfect fit. -Cut off the top of the pumpkin. -Scoop out the pulp on the inside with a spoon. While the pulp isn't necessary for the rest of this project, you might have other uses for it -- save it if you need it, otherwise you can discard. -Place the votive or tea light candles inside the pumpkin and enjoy! 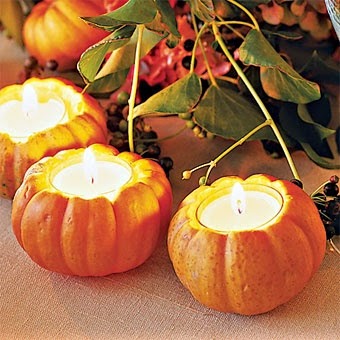 |